
Many homeowners researching radon solutions eventually come across the idea of DIY radon mitigation. The concept sounds appealing. Installing a mitigation system yourself could save money and allow homeowners to take control of improving their indoor air quality. With the rise of online tutorials and home improvement culture, many people assume radon systems are similar to other do-it-yourself projects. However, radon mitigation is far more technical than most typical home upgrades. While some homeowners attempt DIY approaches, effective radon mitigation often requires specialized design, equipment, and testing to ensure it works properly and keeps radon levels low over time.
Radon mitigation systems must address complex factors such as soil pressure, airflow patterns, foundation structure, and ventilation pathways. These variables differ from home to home, which means there is rarely a single universal system design that works everywhere. A system that works in one house may fail completely in another. That is why professional radon mitigation typically involves certified radon specialists who evaluate the property and design a customized system. Understanding how DIY radon mitigation works and where its limitations lie can help homeowners make a safer and more informed decision.
Quick Answer: Is DIY Radon Mitigation Effective?
Can Homeowners Install Their Own Radon Mitigation System?
In some situations, homeowners technically can install a radon mitigation system themselves. Many of the components used in radon mitigation systems are commercially available. Fans, vent pipes, and sealing materials can be purchased online or through hardware suppliers. This makes the concept of DIY radon mitigation seem accessible to people with strong home-improvement skills. However, installing components is only one part of the process. Designing a system that actually reduces radon levels effectively is much more complicated.
Radon mitigation systems rely heavily on pressure differences beneath the home’s foundation. If the airflow path is incorrect or the fan is improperly sized, the system may not reduce radon levels at all. In some cases, poorly designed systems can even increase indoor radon levels by altering airflow in the wrong direction. This is why testing and professional evaluation are so important before installation.
When DIY Radon Mitigation Might Work
There are limited situations where DIY radon mitigation may provide partial results. Homes with simple slab foundations and moderate radon levels may respond well to basic active soil depressurization systems. Homeowners with experience in ventilation systems or HVAC installations may also feel more comfortable installing certain components. In these cases, a well-researched installation, combined with thorough post-installation testing, may yield acceptable results.
However, success still depends on careful planning and accurate radon measurements. Without proper testing before and after installation, homeowners cannot confirm whether the mitigation system is actually working. Radon levels must be measured to verify success.
When Professional Mitigation Is the Safer Choice
Professional radon mitigation is typically recommended when radon levels are significantly elevated or when the home has a complex foundation design. Homes with crawl spaces, sump pits, drain tile systems, or multiple foundation levels often require more advanced mitigation strategies. Certified professionals understand how soil conditions and building structures affect airflow. Their experience allows them to design systems that achieve reliable radon reduction.
Professional installation also ensures the system meets local building codes and radon mitigation standards. This is especially important if the home will be sold in the future. Documentation of professional mitigation can provide reassurance to buyers and inspectors.
What DIY Radon Mitigation Looks Like
Basic Components of a Radon Mitigation System
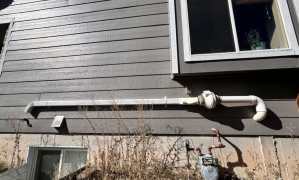
Most radon mitigation systems share a few core components. These typically include a radon fan, a vent pipe, and sealed foundation openings. The fan creates negative pressure beneath the home’s foundation to draw radon gas away before it enters the living space. The vent pipe carries the radon safely above the roofline, where it disperses into outdoor air. Sealing cracks and penetrations improves system efficiency by preventing radon from entering the home.
Although these components appear simple, their placement and sizing are critical to system performance. A poorly positioned vent pipe or incorrectly sized fan can reduce the system’s effectiveness. Proper system design determines how well these components work together.
The Most Common DIY Method: Active Soil Depressurization
The most common form of DIY radon mitigation is active soil depressurization. This system pulls radon gas from beneath the foundation using a fan and pipe network. The negative pressure created beneath the slab prevents radon from entering the home through cracks or gaps. In theory, this system can be installed by homeowners with advanced DIY experience.
However, active soil depressurization must be carefully engineered to ensure sufficient suction across the entire foundation area. Larger homes or homes with complex foundations may require multiple suction points. Determining the correct configuration requires specialized knowledge and diagnostic tools.
Why System Design Matters
Radon mitigation is not simply about installing a fan and pipe. It involves understanding airflow dynamics, soil permeability, and pressure zones beneath the foundation. If the system does not generate adequate suction beneath the slab, radon may continue to enter the home. This is one of the main reasons that professional radon mitigation systems often outperform DIY systems. Proper design ensures the system targets the correct areas and maintains consistent performance.
At Better Colorado Radon, we take a boutique approach to radon mitigation system design. Every home is different, which means every system should be thoughtfully designed to match the property’s layout and visual character. Our team focuses on creating mitigation solutions that are cohesive with the home’s look while minimizing visual impact. Pipe routing, fan placement, and venting locations are carefully planned to ensure the system performs effectively without disrupting the property’s appearance. This customized approach allows homeowners to address radon safely while preserving their home’s overall aesthetic.
Challenges of DIY Radon Mitigation
Incorrect System Design
One of the most common problems with DIY radon mitigation is incorrect system design. Homeowners may install a system that does not properly address the source of radon entry. Radon enters homes through multiple pathways, including foundation cracks, sump pits, construction joints, and crawl spaces. Without professional diagnostics, it can be difficult to determine where to place suction points to effectively capture radon gas before it enters the living space. Incorrect placement can lead to uneven airflow beneath the foundation and ineffective radon reduction. In some situations, poor system design can even redirect radon into other areas of the home. Professional radon mitigation systems are carefully engineered to account for soil conditions, foundation type, and pressure zones beneath the building.
Improper Fan Sizing or Placement
Radon fans must be carefully selected based on soil conditions and foundation characteristics. The fan is the driving force of a radon mitigation system, so choosing the correct size is critical for system performance. Fans that are too small may not generate enough suction to pull radon gas from beneath the slab. This means radon may continue to enter the home even with a system installed. On the other hand, fans that are too powerful can waste energy and create unnecessary noise or pressure imbalances within the home. Improper fan placement can also lead to vibration or sound issues inside living spaces. Professional installers evaluate soil permeability and airflow resistance before selecting the correct fan and placement location.
Sealing Issues and Airflow Problems
Effective radon mitigation often requires sealing cracks, sump lids, and foundation penetrations. These openings are common pathways for radon gas to enter the home from the soil below. DIY installations sometimes overlook these areas or fail to seal them properly, significantly reducing system effectiveness. Even small gaps around pipes or floor drains can allow radon to bypass the mitigation system entirely. Proper sealing also helps maintain consistent pressure beneath the foundation, which improves the performance of the mitigation system. Without these steps, airflow may not move toward the suction point as intended. Professional radon mitigation typically includes detailed sealing work as part of the overall system design.
No Verification Testing
One of the biggest challenges of DIY radon mitigation is the lack of verification testing. Without proper testing before and after installation, homeowners cannot confirm whether the system is reducing radon levels. Radon concentrations can fluctuate daily and seasonally, so testing must be conducted carefully to obtain accurate results. A mitigation system may appear to be working even if radon levels remain above recommended limits. Professional radon mitigation services always include follow-up testing to verify that the system is functioning correctly. This testing ensures radon levels fall below the EPA action level of 4.0 picocuries per liter. Ongoing monitoring is also recommended to ensure the system continues to perform over time.
Why Many Homeowners Choose Professional Radon Mitigation
Certified Radon Professionals Understand System Design
Certified radon professionals undergo specialized training in radon measurement and in the design of mitigation systems. This training includes understanding how radon gas moves through soil, how pressure differences affect airflow beneath a home, and how different foundation types influence radon entry. Professionals learn how to evaluate soil permeability, structural design, and ventilation conditions that may affect mitigation performance. They also understand how basements, crawl spaces, sump pits, and drain tile systems impact system design. This expertise enables them to design systems tailored to each home rather than relying on a generic approach. Because no two homes are exactly alike, proper system design requires both technical knowledge and field experience. Working with a certified professional greatly increases the likelihood that radon levels will be reduced effectively and consistently.
Proper Installation and Code Compliance
Professional installers ensure radon mitigation systems meet local building codes and safety standards. These regulations often include specific requirements for vent pipe placement, system labeling, electrical connections, and exhaust discharge locations. Proper vent pipe routing is especially important because it determines how efficiently radon gas is removed from the home. Installers must also ensure that vent pipes terminate above the roofline to ensure radon is safely dispersed outdoors. Fan placement is another critical factor because fans must operate continuously while minimizing noise and vibration inside the home. Electrical connections must also be installed safely and in accordance with code requirements. Professional installation ensures the system functions properly while also protecting the home’s structural integrity and safety.
Post-Mitigation Testing to Confirm Results
Professional radon mitigation services include post-installation testing to verify results. This step confirms that the mitigation system is successfully reducing radon levels to below recommended action thresholds. Radon levels can fluctuate due to weather conditions, soil moisture, and changes in indoor air pressure, making accurate testing essential. Certified professionals use approved radon measurement devices to ensure reliable results. If radon levels remain elevated, adjustments to the system can improve performance. Follow-up testing also provides homeowners with documentation that the mitigation system is functioning correctly. Learn more about professional services on our Residential Radon Testing page.
Should You Attempt DIY Radon Mitigation?
Before attempting DIY radon mitigation, homeowners should consider several key factors to ensure the system works properly. Radon mitigation requires accurate testing, a clear system design, and follow-up verification to confirm success. Use the checklist below before deciding to move forward.
✔ Radon Levels Confirmed Through Testing
Radon levels should always be confirmed through proper testing before considering mitigation. Understanding how to read a radon test helps determine whether levels exceed EPA recommendations and require action.
✔ Home Structure Evaluated
The structure of the home plays a major role in how radon enters and how a mitigation system should be designed. Factors such as foundation type, crawl spaces, sump pits, and soil conditions can impact system effectiveness.
✔ System Design Understood
Homeowners should have a clear plan for where the suction point, vent pipe, and fan will be installed. Proper system design ensures the mitigation system creates the pressure needed to capture radon gas beneath the foundation.
✔ Post-Install Testing Planned
Testing after installation confirms whether the mitigation system successfully reduced radon levels. Follow-up testing is essential because radon levels can fluctuate, and the system must be verified to ensure it works properly.
DIY Radon Mitigation vs Professional Installation
While DIY radon mitigation systems exist, radon mitigation is more complex than many homeowners expect. Effective radon reduction requires careful system design, proper installation, and thorough verification testing. Without these elements, a system may fail to adequately reduce radon levels.
Professional radon mitigation provides a reliable and tested solution for reducing radon exposure. Certified experts evaluate the home, design the appropriate system, and confirm the results through testing. This ensures long-term protection for your family and your property.
If you are concerned about radon levels in your home, the safest step is to schedule professional radon testing or mitigation with Better Colorado Radon.