
Radon mitigation system installation typically takes four to eight hours for a standard residential property. A licensed professional drills a suction point through the foundation, installs a PVC pipe system routed to the exterior, and connects a continuously running fan that draws radon from beneath the slab and vents it safely outside. Most Colorado homeowners see radon levels drop significantly within 24 hours of installation, with post-mitigation testing confirming results shortly after.
If you’ve received an elevated radon test result, radon mitigation system installation is the next step. Don’t worry, the process is more straightforward than most homeowners expect. Here’s what to know before, during, and after installation day.
What Is a Radon Mitigation System?
The most widely used and effective method is active soil depressurization (ASD). A pipe is installed through the foundation slab, connected to a fan that runs continuously, pulling radon from beneath the home and venting it above the roofline before it can enter the living space. The system reverses the natural pressure dynamic that draws soil gas into a building, intercepting radon at the source rather than filtering it once it’s inside.
Other system types address homes without traditional slabs. Crawl space systems use sub-membrane depressurization combined with encapsulation. Drain tile systems connect to existing interior drainage channels. Block wall systems address radon migrating through hollow concrete blocks. The right approach depends on your foundation type, which a licensed contractor assesses before installation. Our residential radon mitigation page covers what each option involves.
How to Know If Your Home Needs a Radon Mitigation System
The EPA recommends taking action when indoor radon reaches 4.0 pCi/L or higher, and considering mitigation at levels between 2.0 and 4.0 pCi/L. The only way to know where your home stands is to test. Radon is invisible and odorless, and there’s no other way to detect it.
In Colorado, testing isn’t optional due diligence; it’s a practical necessity. All 64 counties carry a high radon potential designation, and roughly half of homes tested come back above the EPA action level. The state’s average indoor radon level is around 6.4 pCi/L, well above the national average of 1.3 pCi/L. Delaying mitigation after a high result means continued cumulative exposure, so the sooner a system is in place, the better.
What Happens During Radon Mitigation System Installation?
Pre-Installation Assessment
The installer begins by walking the home to evaluate the foundation type, slab construction, sub-slab conditions, and the best routing path for the vent pipe. A communication test is performed by drilling a small hole through the slab and measuring how well air moves through the sub-slab aggregate; this determines how many suction points the system will need and where to place them.
Drilling the Suction Point
Once the assessment is complete, the installer drills a three- to four-inch hole through the slab at the optimal location. Material beneath the slab is removed from the immediate area to create a small collection cavity that helps the system draw radon from a wider area around the suction point.
Installing the Pipe and Fan
A PVC pipe is fitted into the suction point and connected to an inline fan. The fan runs continuously at low wattage, maintaining negative pressure beneath the slab. A manometer, a small U-shaped gauge, is installed on the pipe so homeowners can visually confirm the system is operating correctly.
Routing the System to the Exterior
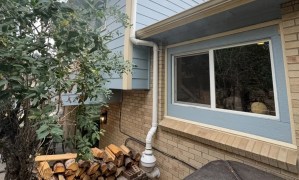
The vent pipe is routed either through the interior, up through a closet or utility chase and out through the roof, or along an exterior wall to a point above the roofline. Both routes are equally effective. Interior routing is less visible; exterior routing is simpler to install.
Final Inspection and Pressure Field Testing
After the fan is connected and the pipe is secured, the installer performs a pressure field test to verify that the system is achieving adequate depressurization across the full slab area. All foundation penetrations and identified radon entry points are sealed as part of the final walkthrough. A post-mitigation radon test is then placed to confirm results once the system has been running for 24 hours.
How Long Does Radon Mitigation System Installation Take?
Most single-family homes are completed in 4-8 hours. A straightforward slab or basement installation with a single suction point is typically on the shorter end of that range. Homes with larger footprints, multiple foundation sections, complex routing paths, or sub-slab conditions that require additional suction points take longer.
Before installation day, clear access to the basement or crawl space and to any utility areas the installer may need to route pipe through. If the system will run through an interior closet, empty the closet before the crew arrives. No other major preparation is required. Homeowners can remain in the home during installation.
What Types of Foundations Affect Installation?
Slab-on-Grade Homes
ASD is applied directly through the slab. Because there’s no basement to work from, pipe routing typically runs along an exterior wall or through a garage. Sub-slab communication can vary, sometimes requiring multiple suction points to achieve coverage across the full footprint.
Basement Foundations
Basements offer the most straightforward installation path. The suction point is drilled through the basement floor, and the pipe can be routed through the interior or along an exterior wall with relative ease.
Crawl Space Foundations
Crawl space systems involve installing a heavy-duty polyethylene barrier across the crawl space floor combined with a depressurization fan. This approach addresses both the direct soil contact and the pressure dynamics pulling radon upward through the floor above.
Homes With Mixed Foundation Types
A home with a partial basement and a crawl space, which is common in Colorado, may need a system that addresses both zones separately, with independent suction points or connected pipe runs designed to cover each area.
How Much Does Radon Mitigation System Installation Cost?
In Colorado, professional radon mitigation system installation typically ranges from $800 to $2,500 for a standard residential property, depending on system complexity, the number of suction points needed, and how the pipe needs to be routed. Straightforward slab access and simple routing fall toward the lower end; multi-zone systems or crawl space work push costs higher.
DIY kits exist, but professional installation is worth the investment. A licensed contractor performs the diagnostic work to ensure the system is correctly sized and positioned, seals all identified entry points, and provides post-mitigation testing to confirm the result. An incorrectly placed system may run indefinitely without meaningfully reducing radon levels. Our post on DIY radon mitigation covers where the DIY approach tends to fall short.
What to Expect After Installation
When to Do Post-Mitigation Testing
A post-mitigation radon test should be placed 24 hours after the system has been running and under closed-house conditions. Short-term tests run for 48 hours, and results are typically back within a week. This test is required; it’s the only way to confirm the system is performing correctly and that radon levels have dropped below the EPA action level.
What Radon Levels Should Drop To
A properly installed system typically reduces indoor radon by 90% or more. Most professionally installed systems bring levels well below 2.0 pCi/L, with many reaching close to the outdoor average of 0.4 pCi/L. If post-mitigation results remain above 4.0 pCi/L, the contractor should be contacted to determine whether a second suction point or a higher-capacity fan is needed.
Ongoing Maintenance and Fan Monitoring
Check the manometer gauge periodically. Equal fluid levels on both sides indicate the fan has stopped and the system needs service. Beyond that visual check, retest every two years to confirm radon levels remain stable as the home settles over time. Our guide to radon system maintenance covers everything homeowners need to know to keep their system running effectively long-term.
Schedule Your Radon Mitigation System Installation With Better Colorado Radon
Radon mitigation system installation is a one-day fix with long-term results. In Colorado, where elevated radon is the norm rather than the exception, it’s one of the most direct investments a homeowner can make in the safety of their indoor air. Better Colorado Radon installs professional radon mitigation systems for homes across Colorado, with upfront assessments, post-installation testing, and documented results that hold up through disclosure and resale.
Book Today to schedule your radon mitigation system installation with Better Colorado Radon.